If you suspect water damage behind your siding, the fix starts with taking the siding off. Strip the wall to the sheathing, open any stained or soft sections to check the framing and insulation, replace the bad sheathing, then wrap the house and tape the seams and window openings before new siding goes on. Covering a damaged wall with new siding hides the problem and leaves the leak in place.
Old siding can look tired but intact from the driveway. You find out what it has been hiding only when it comes off. This guide covers the warning signs, what a proper strip-and-repair looks like, and why Niagara weather makes the wall behind the siding worth checking. The photos come from a real Orestorations re-siding job in Fort Erie.
Signs of trouble behind your siding
Most water damage behind siding shows up somewhere else first. Walk the outside of the house, then check the rooms on the other side of those walls.
Outside, look for:
- Siding that bulges, buckles, or sits loose, especially under windows
- Streaks or staining running down from window corners or from where a lower roof meets a wall
- Gaps, cracked caulking, or missing flashing around windows, doors, and vents
- A wall that feels soft or gives when you press on the siding
Inside, look for:
- Stains, peeling paint, or bubbling on walls and ceilings along exterior walls
- A musty smell or mould in one room or one corner
- Windows or doors that start to stick
Natural Resources Canada's guide to insulating walls gives a similar list. It says to address moisture or structural problems before insulating, and names "staining, mould growth, rot, cracks on the inside and exterior wall finishes, and windows and doors that do not operate properly because they are out of square" as indications of problems.
None of these signs proves the wall is rotten. They tell you to look before you buy new siding.
Strip the wall down to the sheathing
Taking the siding off is the only reliable way to see the sheathing: the layer of OSB or plywood nailed to the studs that the siding hangs on. Removal also lets you check windows, flashing, and the joints where roofs meet walls.
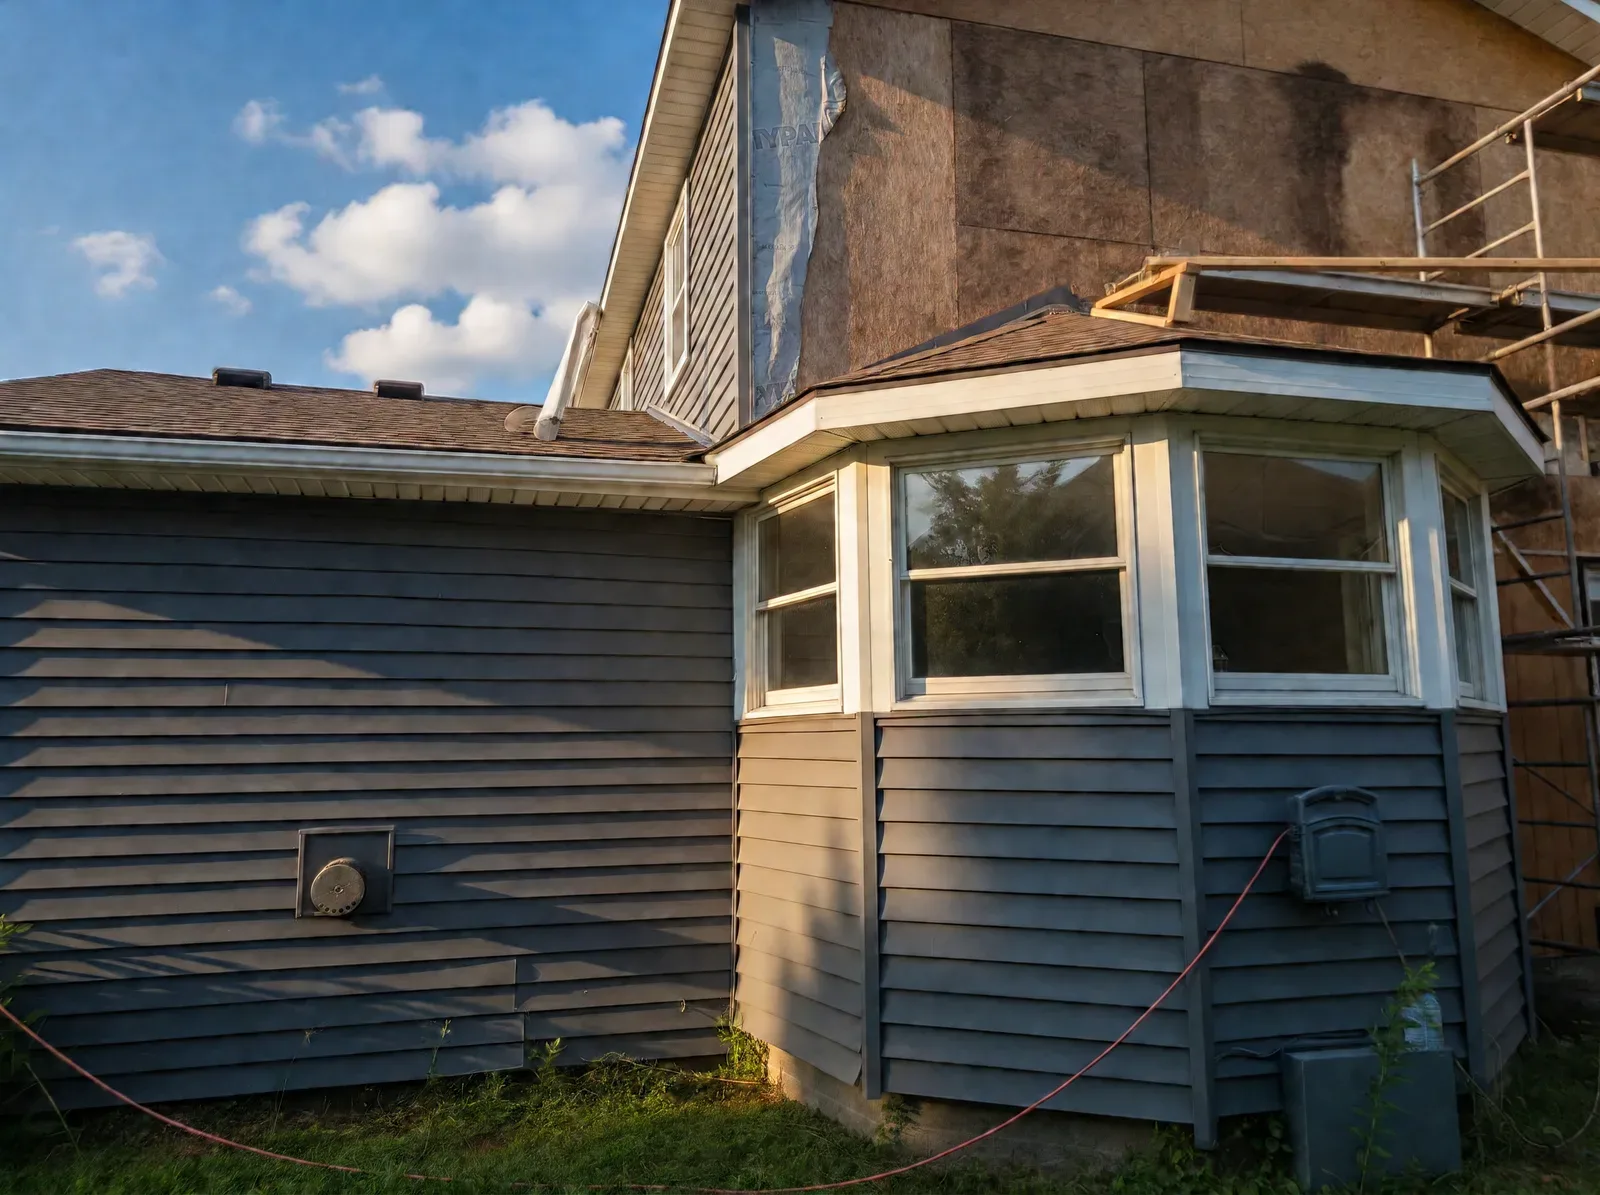
On this two-storey home in Fort Erie, the old grey siding on the lower walls and bay window looked faded but sound. Once the crew stripped the upper storey, front and rear, the OSB told a different story. Dark water stains spread across several panels, and some seams between panels had opened into gaps. None of it showed from the ground.
Old nails, rusted fasteners, and scraps of old building paper come off at this stage too. You want a clean wall so you can judge every panel.
Open stained OSB to check the framing and insulation
A stain on sheathing means water got behind the siding at some point. It does not tell you when, or whether the wood is still sound. Some stains are old and dry. Others sit on top of soft, swollen wood.
Start with the surface:
- Press and probe. Push a screwdriver into the stained area. Sound OSB resists. Soft, crumbling, or spongy spots need to come out.
- Check the edges. OSB that has stayed wet often swells and flakes apart at the panel edges and seams.
- Look below the stain. Water runs down, so follow the stain to the bottom of the wall.
If the worst area is soft, or the stain covers a large patch, cut it open. Opening a section lets you see the studs, the insulation, and the wood at the base of the wall.
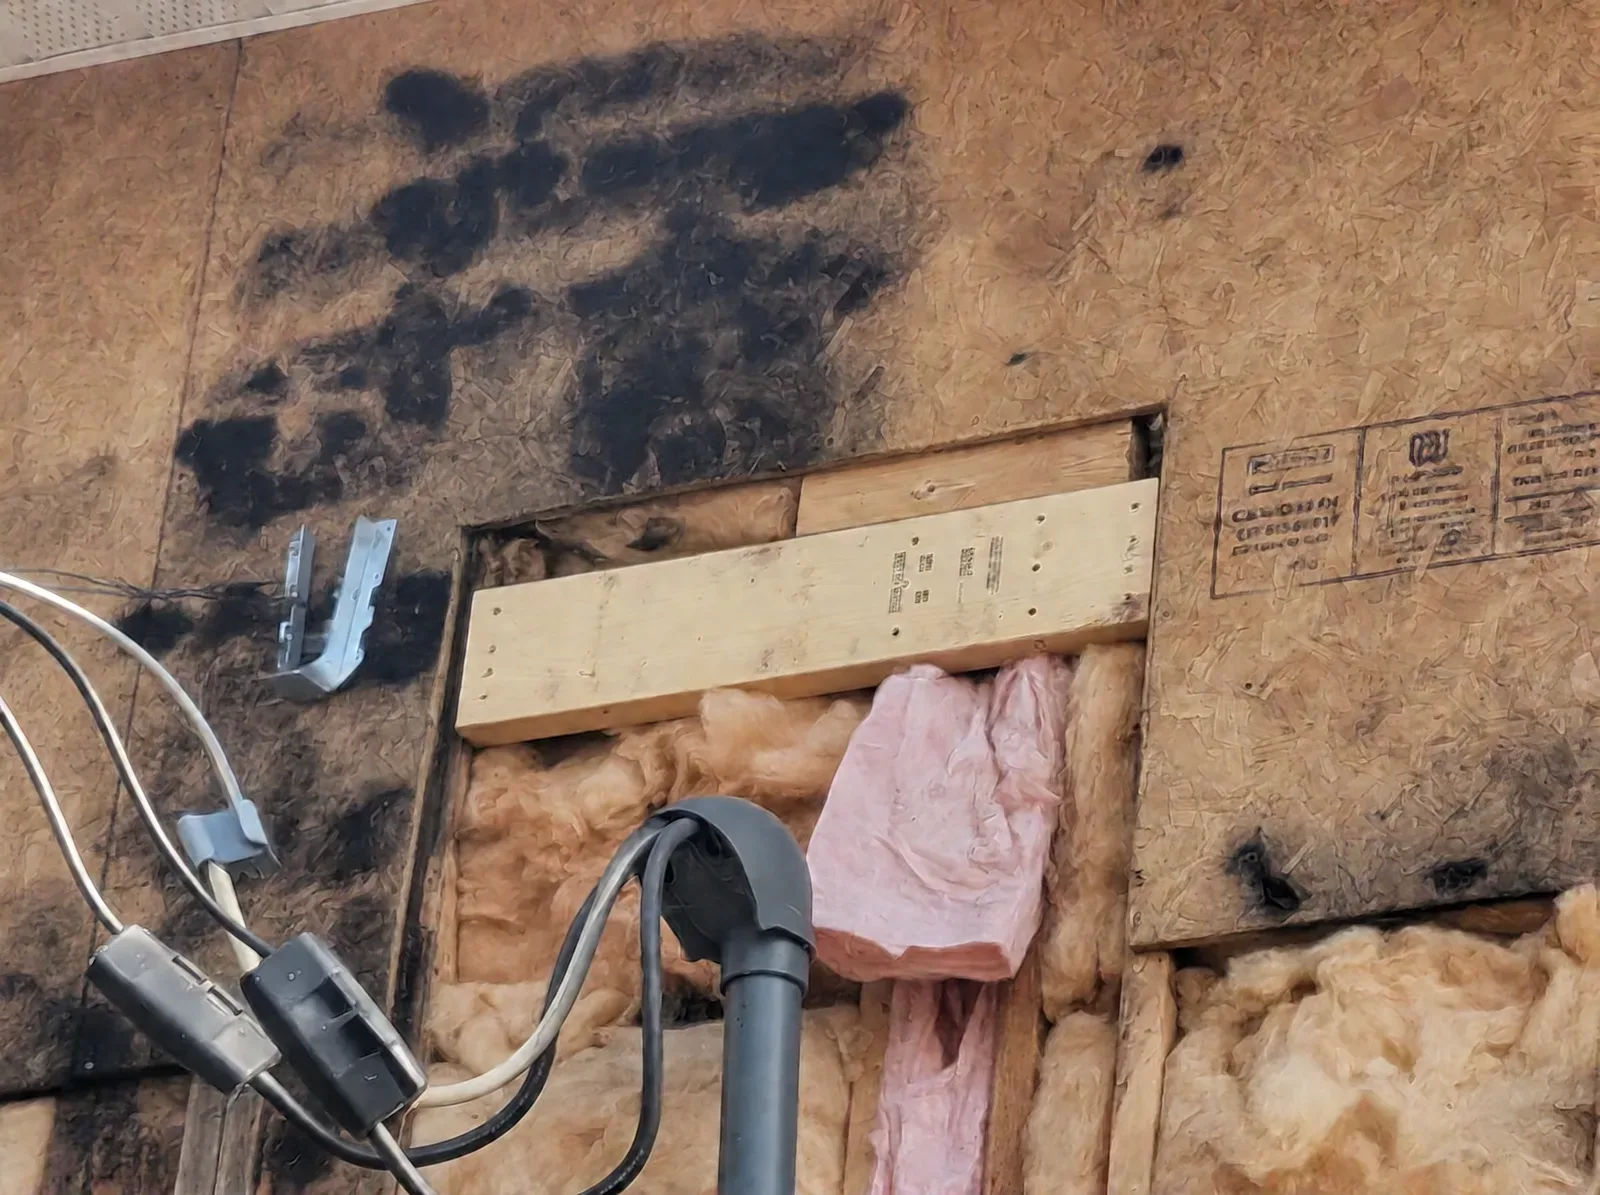
Inside the wall, look for dark or soft studs, insulation that is wet, matted, or stained, and mould on the back of the sheathing. On the Fort Erie job, the crew cut out the worst area under a window. That exposed the studs and pink batt insulation, so the crew could check the framing before closing the wall.
If the framing itself is soft or damaged, the job changes from a sheathing patch to a structural repair. Ask your local building department whether that repair needs a permit before work continues.
Find the source of the water before you close the wall. If the stain sits under a window, the window flashing is the first suspect. If it runs down from a roofline, look at the flashing where the roof meets the wall. New sheathing under an old leak gets wet again.
Patch with new OSB
Once the wet or soft material is out, new OSB panels go into the opened sections. The goal is a flat, solid wall with every panel edge landing on framing and no soft spots left behind. Gaps at old seams get patched so the wall reads as one continuous surface.
On the Fort Erie house, the crew fitted new OSB into the opened sections under the windows and patched the gaps between old panels. On the side entry wall, where the old edge at the base was exposed, they added a new wood board along the bottom.
Stained panels that probe solid can often stay. The decision depends on what you find with the screwdriver and inside the wall, not on colour alone.
Wrap the house and tape the seams and windows
With solid sheathing in place, the walls get a housewrap, also called a sheathing membrane or weather barrier. Siding sheds most rain. The wrap handles the water that still gets behind it and sends it back out, while letting the wall dry outward.
A few details matter more than the brand on the roll:
- Lap it like shingles. Install from the bottom up so each upper course overlaps the one below and water runs over the joints, not into them.
- Tape the seams. Taped joints keep wind from lifting the wrap and driving water through the laps.
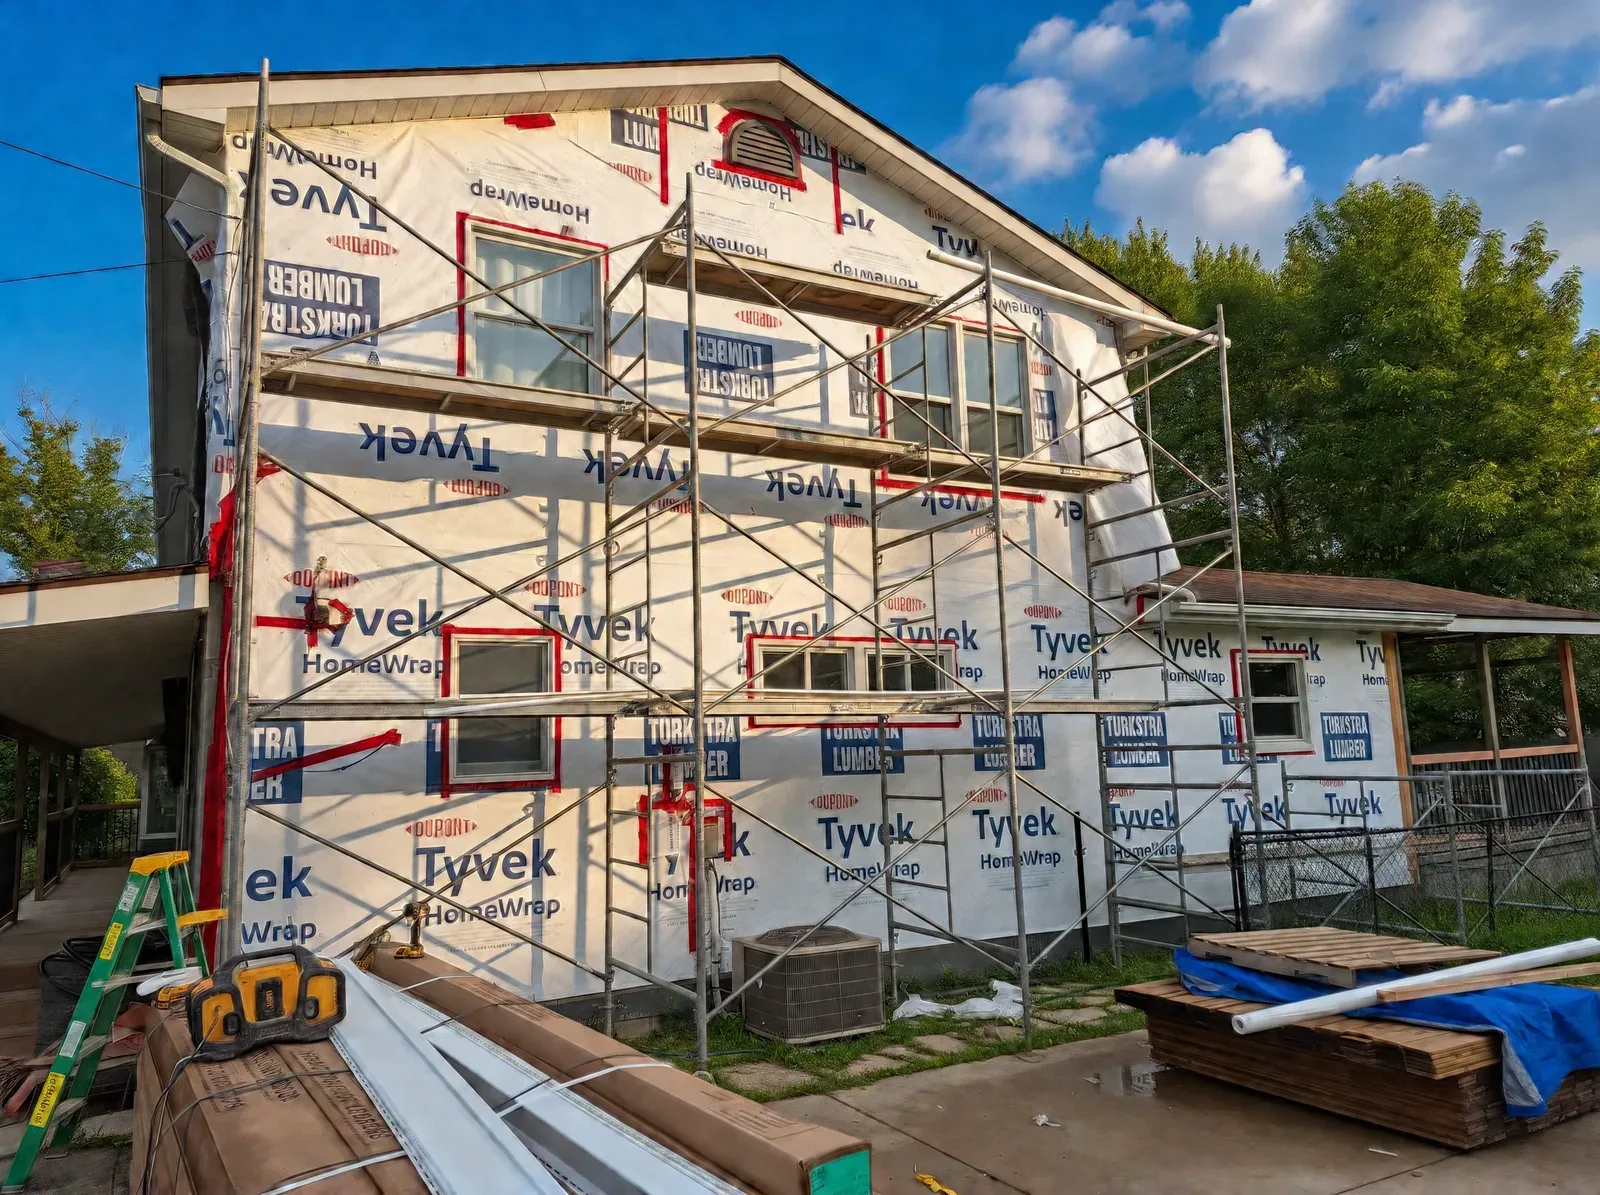
- Seal around every window and door. Openings are where walls leak most. On the Fort Erie house, the stains were worst around the windows, so the taped window openings mattered most.
The Fort Erie job used Typar HouseWrap on the upper wall above a lower roof and Tyvek HomeWrap on the front and rear, with red seam tape at the joints and around each window.
Install the new siding
New siding goes on over the wrap. Follow the siding manufacturer's installation instructions for fastening, spacing, and trim, since those details decide how well the siding sheds water and how it handles temperature swings.
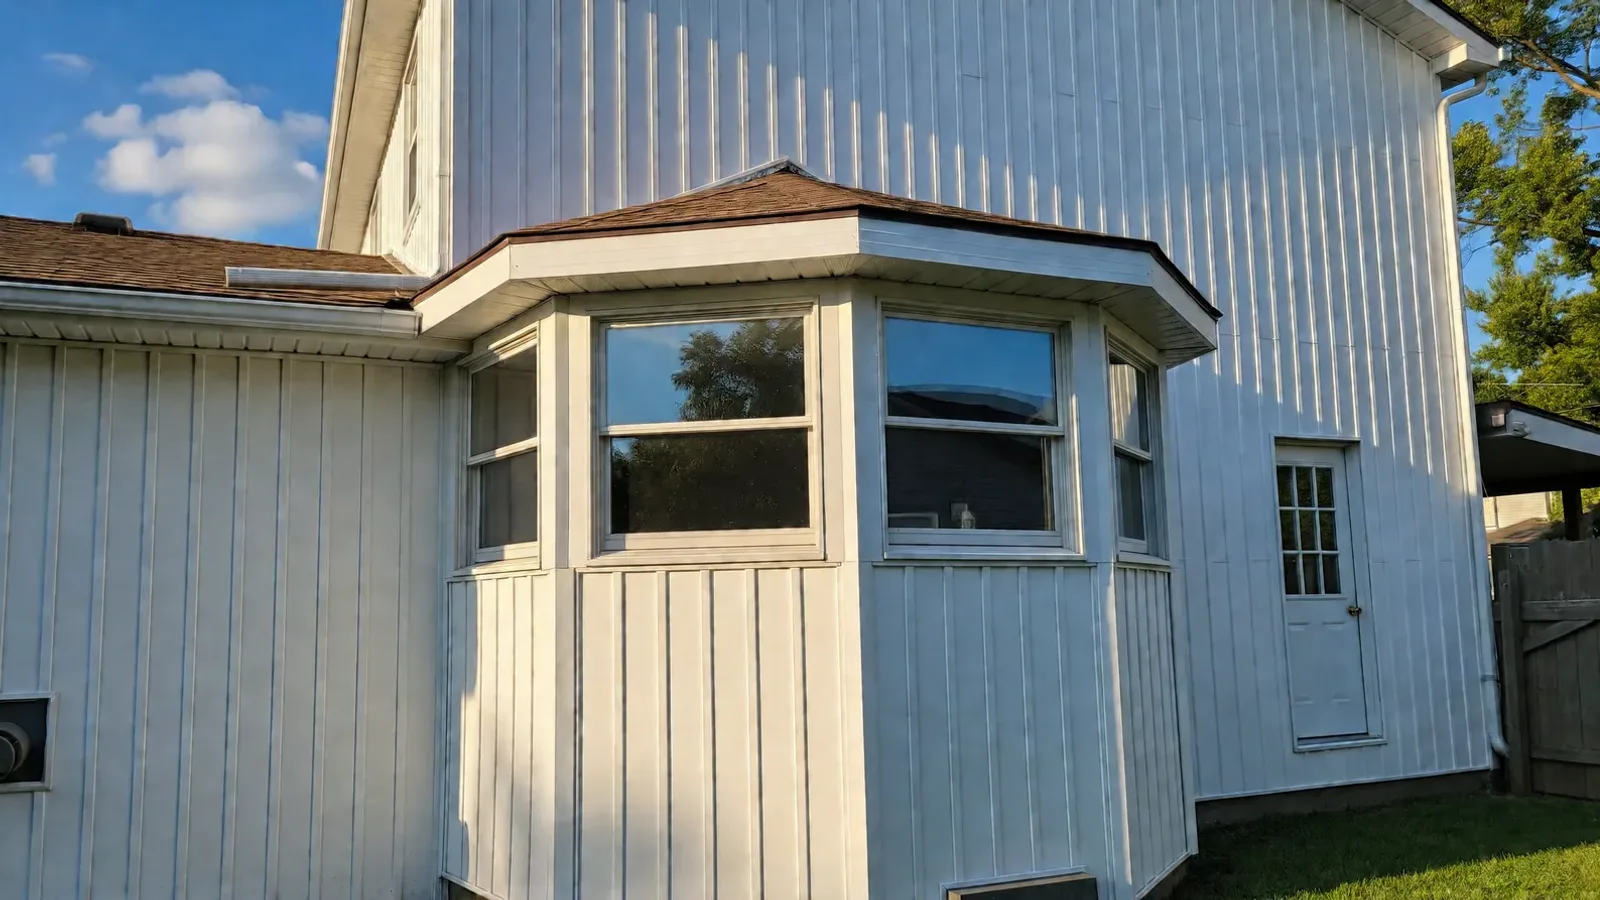
On the Fort Erie home, white vertical siding went up over the wrap on the two-storey walls and around the bay window. The crew brought the siding up to the soffits and trimmed around each window so the wrap stays covered. At the bay window, the vertical boards follow each angled face. You can see every stage, from the stained sheathing to the finished walls, in the Fort Erie exterior siding project.
Why not just put new siding over the old damage?
Putting new siding over a wall you haven't checked saves a day of tear-off and creates bigger problems.
- You lose your only look at the sheathing. New siding over old siding, or over stained sheathing, seals in whatever is there. On the Fort Erie house, removing the old siding showed water staining the new siding would have covered.
- The leak keeps going. If a window or roof joint lets water in, new siding does not change that. The wall keeps getting wet behind a finish that looks brand new.
- Fasteners need solid wood. Nails and screws driven into soft sheathing hold poorly.
Natural Resources Canada makes the same point about exterior renovations: "It is always best to remove the existing siding and perform any upgrades to the structure, wiring, plumbing, cavity insulation and the vapour and air barrier before installing additional insulation under new siding."
Re-siding is also the easiest time to fix the wall. The scaffolding is up and the wall is open, so you can make repairs now that would otherwise mean tearing off new siding later.
Why Niagara weather is hard on the wall behind the siding
Two things work against wood-framed walls in this region: wind-driven rain and freeze-thaw cycles.
Wind pushes rain sideways, under siding laps and into joints around trim and windows. Open lots near Lake Ontario, Lake Erie, or the Niagara River take more wind than sheltered ones, and Fort Erie sits right on the lake and the river.
Once water gets behind the siding, the sheathing stays in the shade, and the wall can stay damp for a long time. Through a Niagara winter, trapped water freezes and thaws over and over at seams, window corners, and the base of the wall. Each cycle works at OSB edges and caulked joints, and small gaps get bigger.
Natural Resources Canada also advises making sure the eaves "will prevent wind-blown water from getting in between the insulation and the siding" when you add insulation under new siding. A good wrap, taped openings, and working flashing are what keep that water out.
Permits and questions to settle before you start
Check the permit question with your municipality before work starts. The City of Niagara Falls building permit page lists "replacing roofing or exterior cladding with a different material" as work that needs a permit. Structural repairs to the framing can trigger a permit too. Other Niagara towns set their own rules; our Niagara renovation permit guide links each municipality's building department.
Settle these questions before anyone starts pulling siding:
- How will hidden damage be handled? Ask how stained or soft sheathing found after the siding comes off will be checked, repaired, and priced.
- Will the crew open stained sections? Stained OSB should be probed, and opened where it is soft, before it gets covered.
- What weather barrier goes on? Ask which housewrap, how seams and window openings are taped, and how the flashing will be handled.
- Does the work need a permit? Changing the siding material or repairing framing can both trigger one. Put who applies in writing.
Getting ready for a site visit? Our renovation quote visit checklist helps you organize photos, measurements, and questions.
- Can new siding go over my old siding?
- Sometimes it can, but you lose the chance to see the sheathing. If there are signs of water getting in, strip the old siding so any damage can be found and fixed before it is sealed behind new siding.
- How do I know if there is water damage behind my siding?
- Look for siding that bulges or sits loose, streaks below windows or roof joints, and inside signs such as stains, peeling paint, musty smells, or sticking windows along exterior walls. The only way to confirm it is to take the siding off and check the sheathing.
- Does stained OSB sheathing always need to be replaced?
- No. A stain shows that water got in at some point. If the OSB probes solid and the edges are not swollen or flaking, it can often stay. Soft, crumbling, or swollen sections should be cut out, and the wall behind them checked.
- Do I need a permit to replace siding in Niagara?
- It depends on the municipality and the scope. The City of Niagara Falls lists replacing exterior cladding with a different material as permit work. Structural repairs can also need a permit. Confirm your exact scope with your local building department.
- How much does it cost to replace siding and repair the sheathing?
- We do not price siding work from a photo, because the condition of the sheathing is unknown until the siding comes off. We visit the property, look at the walls, and then prepare a free quote.
Check the wall before you choose the siding
New siding only lasts as long as the wall behind it. If you see stains, soft spots, or leaks around windows, plan to strip the wall to the sheathing, repair what is wet or soft, wrap and tape it, and then install the new siding.
You can see the full Fort Erie siding renovation, browse completed project case studies, or request a free quote if you'd like someone to look at your walls in person.